Setup remote Git repository on Mac OS X
Information
In this tutorial a remote Git repository will be setup on the Mac OS X.
This repository can be accessed using http.
Before you continue you must setup an Apache web server on the Mac OS X.
If you install Xcode 4 on the Mac OS X, Git will be installed at: /usr/bin/git
To show which git version is installed, type: git --version
Operating system used
Mac OS 10.7 (Lion)
Software prerequisites
Apache web server on the Mac OS X
Procedure
- On the remote machine:
- In this tutorial a remote repository is setup which can be accessed over HTTP/DAV: or HTTPS/DAV:.
Create a remote Git repository inside your web server docroot, type:
cd /Library/WebServer/Documents
sudo mkdir gitprojects
cd /Library/WebServer/Documents/gitprojects
sudo mkdir mydemoproject1.git
Note:
In the Mac OS X the machine web server <docroot> is located at:
/Library/WebServer/Documents
- Create a bare git repository, type:
cd /Library/WebServer/Documents/gitprojects/mydemoproject1.git
sudo git --bare init
You should see:
Initialized empty Git repository in
/Library/WebServer/Documents/gitprojects/mydemoproject1.git/
Note:
The meaning of bare:
By default Git stores the actual bare repository files in a .git directory alongside all the development project files.
But remote repositories only need the repository files in a .git directory and NOT the development project files.
- To allow the web server to update the remote repository (push, clone, commit, etc) you must enable post-update file, type:
cd /Library/WebServer/Documents/gitprojects/mydemoproject1.git/hooks
sudo cp post-update.sample post-update
- Change the owner to _www and group to _www of all files and folders within mydemoproject1.git, type:
cd /Library/WebServer/Documents/gitprojects
sudo chown -R _www:_www mydemoproject1.git
- Execute file post-update, type:
cd /Library/WebServer/Documents/gitprojects/mydemoproject1.git/hooks
sudo -u _www ./post-update
- Run the git command if you want to access the remote repository via http, type:
sudo git --bare update-server-info
- Steve is a developer and need read and write access to mydemoproject1.git.
John is a tester and only needs read access.
To set this up you must create two files:
- /etc/apache2/other/htpasswd-git
- /etc/apache2/other/htgroup-git
Create htpasswd-git file::
cd /etc/apache2/other
sudo htpasswd -c htpasswd-git steve
Password: [enter the sudo password]
New password: [enter steve's password]
Re-type password: [re-enter steve's password]
Adding password for user steve
sudo htpasswd htpasswd-git john
New password: [enter john's password]
Re-type password: [re-enter john's password]
Adding password for user john
Create htgroup-git file::
cd /etc/apache2/other
sudo vi htgroup-git
Add the following lines in file htgroup-git:
mydemoproject1-reader: steve john
mydemoproject1-writer: steve
- Create an Apache web server gitprojects configuration file:
cd /etc/apache2/other
sudo vi gitprojects.conf
Add the following lines in file gitprojects.conf:
DavLockDB "/usr/var/Davlock"
<Directory /Library/WebServer/Documents/gitprojects>
Dav On
Deny from all
AuthType Basic
AuthName "Git repositories"
AuthUserFile /etc/apache2/other/htpasswd-git
AuthGroupFile /etc/apache2/other/htgroup-git
</Directory>
<Directory /Library/WebServer/Documents/gitprojects/mydemoproject1.git>
Allow from all
Order allow,deny
<Limit Get>
Require group mydemoproject1-reader
</Limit>
<Limit GET PUT DELETE PROFIND PROPPATCH MKCOL COPY MOVE LOCK UNLOCK>
Require group mydemoproject1-writer
</Limit>
</Directory>
- The WebDAV (Web-based Distributed Authoring and Versioning) protocol provides a a framework for users to create,
change and move files on a web server.
Create a /usr/var directory:
cd /usr
sudo mkdir var
- Change the owner to _www and group to _www for the var folder:
cd /usr
sudo chown _www:_www var
sudo chmod 777 var
Note:
In /usr/var, WebDav creates two files called:
DavLock.dir and DavLock.pag
The name DavLock is taken from the gitprojects.conf file
- Restart apache web server, type:
sudo apachectl restart
- Test the remote repository, type:
- Start Safari browser and enter url:
http://mac.mobilefish.intranet/gitprojects
You should see:
Forbidden
You don't have permission to access /gitprojects/ on this server
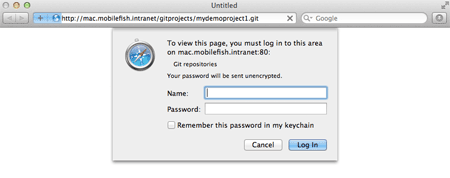
- Start Safari browser and enter url:
http://mac.mobilefish.intranet/gitprojects/mydemoproject1.git
You should see:
- Goto your homedirectory and clone the empty mydemoproject1.git respository, type:
- cd ~
- mkdir dump
- cd dump
- git clone http://[email protected]/gitprojects/ mydemoproject1.git
You should see:
Cloning into gitprojects.mydemoproject1...
Password: [enter steve's password]
warning: You appear to have cloned an empty repository
The folder mydemoproject1 is created.
- On the local machine:
- Start your favourite editor (Eclipse, Xcode, etc..) and create a development project.
Note: If you use Xcode, do not create a local git repository.
In this example the development project parent folder is named: demoproject1
- Open the Terminal application and go to this folder, type:
cd demoproject1
- Create an local git repository in your development project for your local files, type:
git init
You should see:
Initialized empty Git repository in ../demoproject1/.git/
- Add all files if your local Git repository, type:
git add *
- After the files are added you must commit these files, type:
git commit -m "Initial version"
- Create a link to the remote repository, type:
git remote add origin http://mac.mobilefish.intranet/gitprojects/mydemoproject1.git
To list the current remote URLs, type:
git remote -v
To change the remote URLs, type:
git remote set-url origin <new_url>
- If you are Steve, create in your home directory a .netrc file, type:
- cd ~
- vi .netrc
Add the following lines in file .netrc
machine mac.mobilefish.intranet
login steve
password steve_password
- Make sure no one can access .netrc file, type:
chmod 600 .netrc
- Push you code to the remote repository, type:
git push origin master
You should see:
Fetching remote heads...
refs/
refs/heads/
refs/tags/
updating 'refs/heads/master'
from 0000000000000000000000000000000000000000
to d1b8ba6e498f7afd152b27e9b7bb40e97f7ec83b
sending 3 objects
done
Updating remote server info
To http://mac.mobilefish.intranet/gitprojects/mydemoproject1.git
* [new branch] master -> master
|