How to make geth support SSL
Information
none
Operating system used
macOS 10.12 Sierra
Software prerequisites
Node.js
Procedure
- If your website is secure for example: https://www.mobilefish.com and your Dapp want to access a non-secure content:
:
window.web3 = new Web3(new Web3.providers.HttpProvider("http:/localhost:8545"));
:
Your browser will show a warning. If you use the Chrome browser, by default, it will not load scripts
from unauthenticated sources. The user must explicitly alllow this.
To avoid this geth need to support SSL.
- At this moment Sep 14, 2017 geth does not support SSL, but in the future it probably will.
In the meantime, try this workaround solution using your own self signed certificate.
- Create the following folders:
Type: mkdir ~/tools
Type: mkdir ~/tools/proxy
- Create the node package.json file:
Type: cd ~/tools/proxy
Type: npm init
You will see the following:
This utility will walk you through creating a package.json file.
It only covers the most common items, and tries to guess sensible defaults.
See 'npm help json' for definitive documentation on these fields
and exactly what they do.
Use 'npm install <pkg>' afterwards to install a package and
save it as a dependency in the package.json file.
Press ^C at any time to quit.
package name: (proxy)
version: (1.0.0)
description: Proxy server for ethereum node
entry point: (index.js)
test command:
git repository:
keywords:
author: Robert Lie
license: (ISC)
About to write to /Users/robertlie/tools/proxy/package.json:
{
"name": "proxy",
"version": "1.0.0",
"description": "Proxy server for ethereum node",
"main": "index.js",
"scripts": {
"test": "echo \"Error: no test specified\" && exit 1"
},
"author": "Robert Lie",
"license": "ISC"
}
Is this ok? (yes)
- Install "http-proxy" package:
Type: npm install http-proxy --save
- Install "fs" package:
Type: npm install fs --save
- Create file ~/tools/proxy/stop.sh and add the following lines:
#!/bin/bash
ps aux | grep 'node index.js' | grep -v grep | awk '{print $2}' | xargs kill -9
- Change the stop.sh file permission:
Type: chmod 755 stop.sh
- Open the package.json file and edit the "scripts" value:
{
"name": "proxy",
"version": "1.0.0",
"description": "Proxy server for ethereum node",
"main": "index.js",
"scripts": {
"start": "node index.js &",
"stop": "./stop.sh"
},
"author": "Robert Lie",
"license": "ISC",
"dependencies": {
"fs": "0.0.1-security",
"http-proxy": "^1.16.2"
}
}
- Create the index.js file:
Type: touch ~/tools/proxy/index.js
- The index.js file contains the following lines. Modify the paths according to your situation:
var httpProxy = require('http-proxy');
var fs = require('fs');
httpProxy.createServer({
target: {
host: 'localhost',
port: 8545
},
ssl: {
key: fs.readFileSync(
'/Users/robertlie/tools/proxy/ssl/proxy.mobilefish.key', 'utf8'),
cert: fs.readFileSync(
'/Users/robertlie/tools/proxy/ssl/proxy.mobilefish.crt', 'utf8')
}
}).listen(9070);
- We need to create the proxy server certificate (proxy.mobilefish.crt) and proxy server private key (proxy.mobilefish.key).
- First create a self signed SSL certificate issued by a Certificate Authority (CA).
The Certificate Authority is in this case yourself.
- Type: mkdir ~/tools/proxy/ssl
Type: cd ~/tools/proxy/ssl
- First create a 2048 bit CA private key.
Type: sudo openssl genrsa -out privkey.pem 2048
You will see the following:
Generating RSA private key, 2048 bit long modulus
..............................................+++
...........+++
e is 65537 (0x10001)
- The following file is created:
~/tools/proxy/ssl/privkey.pem (this is the CA private key)
- Create a self signed CA certificate.
Type: sudo openssl req -new -x509 -days 3650 -nodes -key privkey.pem -sha256 -out ca.pem
Enter the following information (change the values according to your situation):
You are about to be asked to enter information that will be incorporated
into your certificate request.
What you are about to enter is what is called a Distinguished Name or a DN.
There are quite a few fields but you can leave some blank
For some fields there will be a default value,
If you enter '.', the field will be left blank.
-----
Country Name (2 letter code) [AU]:NL
State or Province Name (full name) [Some-State]:Noord-Holland
Locality Name (eg, city) []:Zaandam
Organization Name (eg, company) [Internet Widgits Pty Ltd]:Mobilefish.com CA
Organizational Unit Name (eg, section) []:
Common Name (e.g. server FQDN or YOUR name) []:
Email Address []:
- The following file is created:
~/tools/proxy/ssl/ca.pem (this is the CA certificate)
- Create a server configuration file ~/tools/proxy/ssl/proxy.mobilefish.csr.cnf containing the following lines:
[req]
default_bits = 2048
prompt = no
default_md = sha256
distinguished_name = dn
[dn]
C=NL
ST=Zaandam
L=Noord-Holland
O=End Point
OU=Research and development
[email protected]
CN = proxy.mobilefish.com
- Create the server Certificate Signing Request and server private key.
Type: sudo openssl req -new -sha256 -nodes -out proxy.mobilefish.csr -newkey rsa:2048 -keyout proxy.mobilefish.key -config proxy.mobilefish.csr.cnf
You will see the following:
Generating a 2048 bit RSA private key
.................................................+++
....................+++
writing new private key to 'proxy.mobilefish.key'
-----
- The following files are created:
~/tools/proxy/ssl/proxy.mobilefish.csr (this is the server certificate signing request)
~/tools/proxy/ssl/proxy.mobilefish.key (this is the server private key)
- Create a server extension file ~/tools/proxy/ssl/proxy.mobilefish_v3.ext containing the following lines:
authorityKeyIdentifier=keyid,issuer
basicConstraints=CA:FALSE
keyUsage = digitalSignature, nonRepudiation, keyEncipherment, dataEncipherment
subjectAltName = @alt_names
[alt_names]
DNS.1 = proxy.mobilefish.com
Note:
This is step is needed if you want to avoid the following error in Chrome browser:
This server could not prove that it is proxy.mobilefish.com; its security certificate
does not specify Subject Alternative Names. This may be caused by a
misconfiguration or an attacker intercepting your connection.
- Create the server certificate.
Type: sudo openssl x509 -req -in proxy.mobilefish.csr -CA ca.pem -CAkey privkey.pem -CAcreateserial -out proxy.mobilefish.crt -days 3650 -sha256 -extfile proxy.mobilefish_v3.ext
You will see the following:
Signature ok
subject=/C=NL/ST=Zaandam/L=Noord-Holland/O=End Point/OU=Research and development/ [email protected]/ CN=proxy.mobilefish.com
Getting CA Private Key
- The following file is created:
~/tools/proxy/ssl/proxy.mobilefish.crt (this is the server certificate)
- The following steps applies to Mac users. How it is done on other OS I do not know (sorry..).
The proxy.mobilefish.crt certificate is self signed and is not created by an official CA Authority.
To always trust our own self signed certificate:
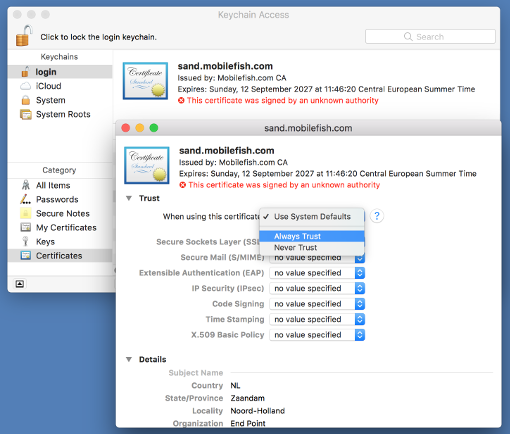
- Right click file proxy.mobilefish.crt and select "Open With" and select "Keychain Access".
- Open the "Keychain Access" app if it does not open.
- Double click the certificate proxy.mobilefish.com.
- Expand Trust.
- Select "When using this certificate" Always Trust.
Note: The image is an example of another subdomain!
- Now add the following line in your hosts file (/etc/hosts):
127.0.0.1 proxy.mobilefish.com
- By default the geth HTTP JSON-RPC address is localhost and its port is 8545. If you have changed this:
geth --rpc --rpcaddr <ip> --rpcport <portnumber>
...modify the target host and port in file ~/tools/proxy/index.js accordingly.
- In your Dapp for example Demonstration Ethereum Dapp, modify your
Web3.providers.HttpProvider.
window.web3 = new Web3(new Web3.providers.HttpProvider( "https://proxy.mobilefish.com:9070"));
Note:
The proxy server address is: proxy.mobilefish.com (Set in: /etc/host)
The proxy server port is: 9070 (Set in: ~/tools/proxy/ssl/index.js)
- Start your geth node.
- Start the proxy server.
Type: cd ~/tools/proxy/
Type: npm start
- Stop the proxy server.
Type: cd ~/tools/proxy/
Type: npm stop
- Open the Chrome browser and access your Dapp for example Demonstration Ethereum Dapp.
The browser should not display any warning messages.
|