Maven


Maven is a Java project management and project comprehension tool. It's primary goal is to make the developers life easier by providing a well defined project structure, well defined development processes to follow, and a coherent body of documentation that keeps your developers and clients apprised of what's happening with your project.

Maven is distributed at no charge for commercial or non-commercial use and is licensed under the Apache License, Version 2.0.

More information about Maven can be found at: http://maven.apache.org

The latest Maven version can be downloaded from: http://maven.apache.org/download.html


Maven 3.0.4: Convert a Maven project into an Eclipse project using the pom.xml


Information
Before you can create a Maven project you need to have internet access because Maven automatically downloads dependencies (= JAR files) from remote central repositories.

Operating system used
Windows Vista Home Premium SP 2

Software prerequisites
Maven 3.0.4
Eclipse Classic (Indigo Packages)

Procedure
  1. First create a Maven project, for example: Setup web application with Jetty server.

  2. Open a Windows Terminal and goto the Maven project folder where the pom.xml file is located.

    For example: cd C:\mymockapi\mockapi

  3. Convert the Maven project into an Eclipse project.
    Type: mvn eclipse:eclipse

    You will see:
    :
    Downloaded: http://repo.maven.apache.org/maven2/org/eclipse/core/resources/3.3.0
    -v20070604/resources-3.3.0-v20070604.jar (663 KB at 866.3 KB/sec)
    [INFO] Using Eclipse Workspace: null
    [INFO] Adding default classpath container: org.eclipse.jdt.launching.JRE_CONTAINER
    [INFO] Wrote settings to C:\mymockapi\mockapi\.settings\org.eclipse.jdt.core.prefs
    [INFO] Wrote Eclipse project for "mockapi" to c:\mymockapi\mockapi.
    [INFO]
    [INFO] ------------------------------------------------------------------------
    [INFO] BUILD SUCCESS
    [INFO] ------------------------------------------------------------------------
    [INFO] Total time: 5.916s
    [INFO] Finished at: Tue Oct 30 21:34:53 CET 2012
    [INFO] Final Memory: 6M/11M
    [INFO] ------------------------------------------------------------------------


    Note 1:
    One directory and two files are created. These are Eclipse settings.
    • .settings
    • .classpath
    • .project

    Note 2:
    The pom.xml file is not changed.

  4. Create a Eclipse workspace.
    For example: c:\workspace_maven

  5. In this tutorial Eclipse Classic (Indigo Packages) is used.

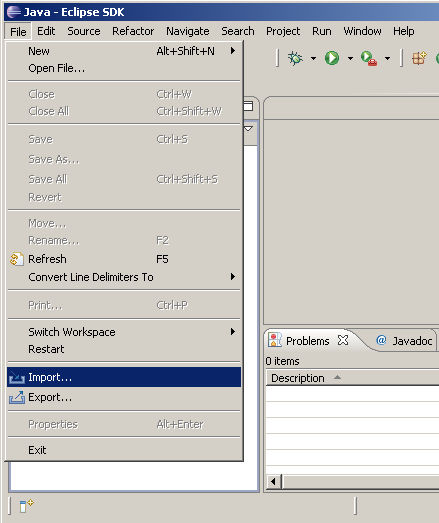
  6. Start Eclipse and select menu: File | Import

    Eclipse menu: File, Import

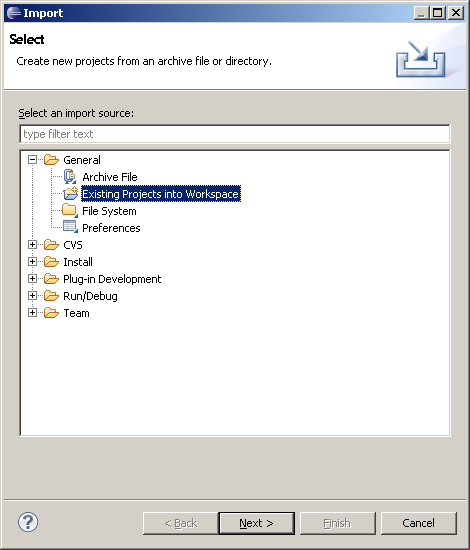
  7. Expand: General and select: Existing Projects into Workspace

    Import existing project into workspace

    Press: Next button

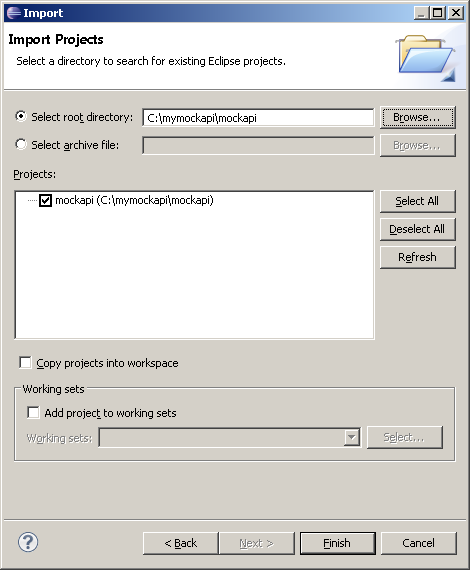
  8. Select root directory. The directory where the pom.xml file is located.
    For example: C:\mymockapi\mockapi

    Select root directory

    Press: Finish button

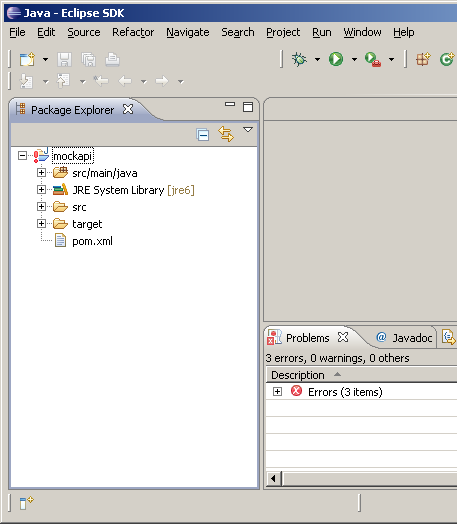
  9. The maven project is now imported into Eclipse.

    Maven project imported into Eclipse

  10. Fix the "Unbound classpath variable: M2_REPO.." errors.
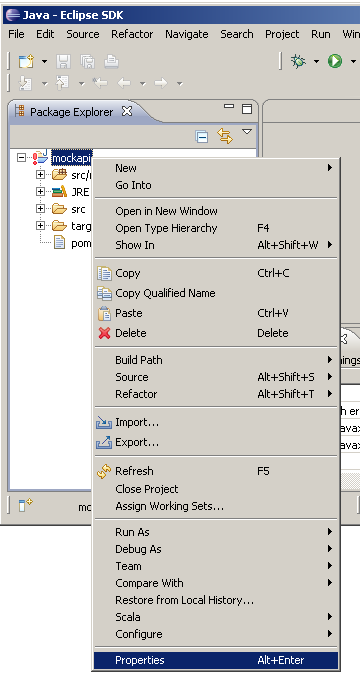
    Right click the project folder "mockapi" and select properties.

    Eclipse project properties


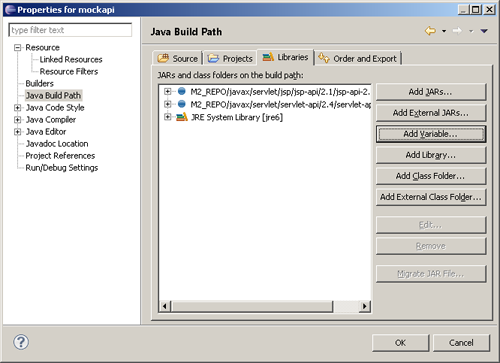
  11. Select: Java Build Path, select tab Libraries and press button: Add Variable...

    Eclipse Java build path

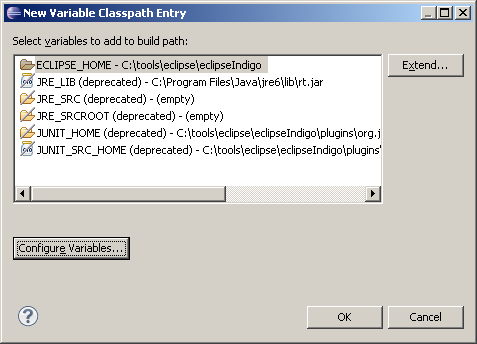
  12. Press button: Configure Variables...

    Eclipse configure variables

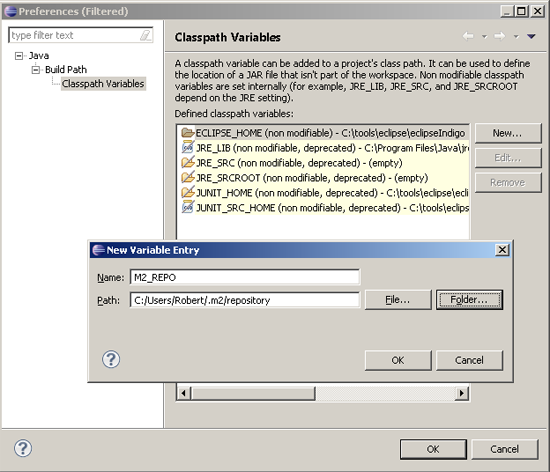
  13. Press button: New...
    Enter Name: M2_REPO
    Enter Path: The location of your local maven repository

    Eclipse classpath variable entry

    Press OK button
    Press OK Button

  14. A message is displayed:
    The classpath variabels have changed. A full rebuild is recommended for changes to take effect.
    Do the full build now?
    Press: Yes button
    Press: OK multiple times to close all open screens

  15. All Eclipse error messages should disappear.

  16. To run maven commands within Eclipse you should install the Maven plugin in Eclipse (M2Eclipse plugin)
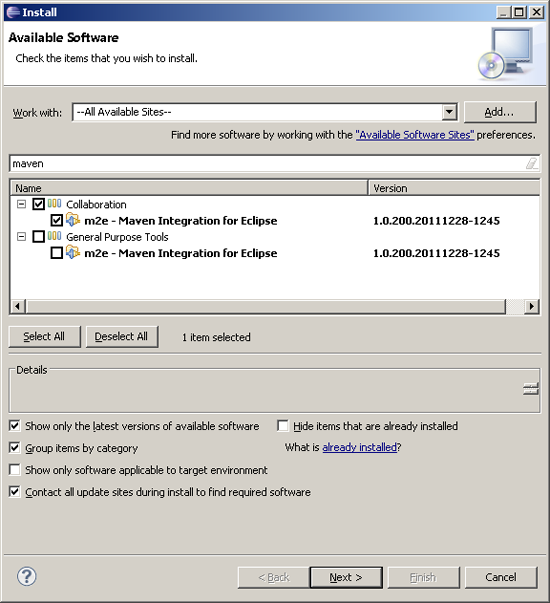
    Select Menu: Help | Install New Software...

  17. Open pulldown menu and select "--All Avalable Sites--"
    Enter in search box: maven
    Select: Collaboration | m2e - Maven Integration for Eclipse

    Eclipse: Install software

    Press Next button
    Press Next button
    Accept the license agreement
    Press Finish button

  18. A message will be diplayed

    Restart Eclipse for installation changes to take effectRestart Eclipse for installation changes to take effect

  19. Press: Restart Now

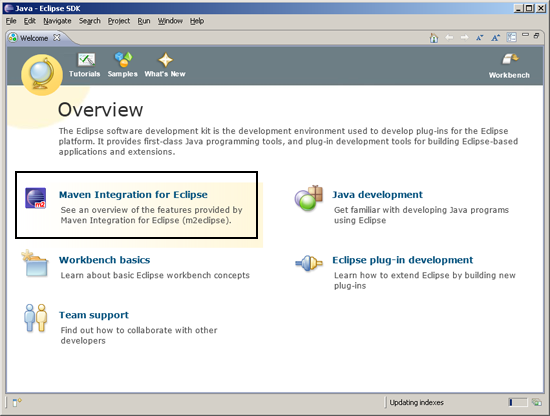
  20. After Eclipse is restarted, the Maven plugin is installed.

    Eclipse Maven plugin is installed

  21. Goto workbench

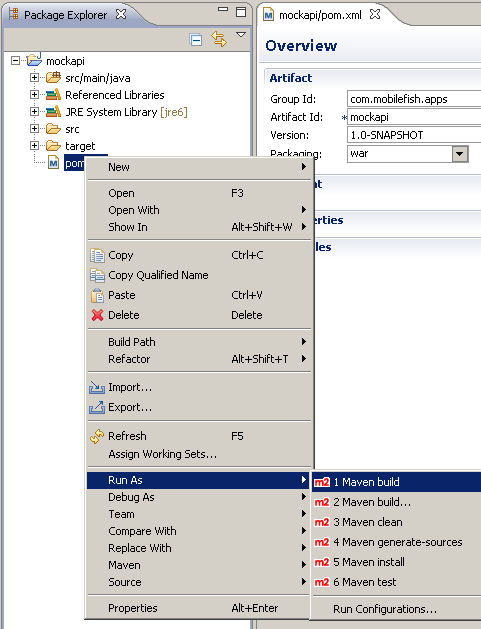
  22. To run Maven commands, right click the pom.xml file and select option "Run as"

    Run Maven in Eclipse