Apache is a powerful and flexible HTTP/1.1 compliant
web server. Originally designed as a replacement for the NCSA HTTP
Server, it has grown to be the most popular web server on the
Internet. As a project of the Apache Software Foundation, the
developers aim to collaboratively develop and maintain a robust,
commercial-grade, standards-based server with freely available
source code.
The Apache HTTP Server is distributed at no charge for
commercial or non-commercial use. For more information read the LICENSE.txt file.
Apache can be used with Microsoft Windows. The
Apache HTTP Server Version 2.0 runs under Windows NT, Windows 2000 and
Windows XP. You should download the version of Apache for Windows with
the .msi extension. This is a single Microsoft Installer file containing Apache,
ready to install and run.
The latest Apache HTTP Server version can be downloaded from:
http://httpd.apache.org/
The latest Apache 1.3 documentation can be found at:
http://httpd.apache.org/docs/1.3/
The latest Apache 2.0 documentation can be found at:
http://httpd.apache.org/docs/2.0/
The latest Apache 2.2 documentation can be found at:
http://httpd.apache.org/docs/2.2/
Using Apache .htaccess file.
Information
The .htaccess files (you must put a period in front of the filename) can be placed in the various directories of your docroot
and overrides the options set in the httpd config file.
An .htaccess file only applies for that directory where the file is set
and its subdirectories.
Place commands on each line (do not wrap) in the .htaccess and comments are marked with a hash (#) at the start of the line.
Use the ASCII mode when you upload the files.
Usually an .htaccess file is used when you do not have access to the httpd.conf file.
If possible avoid using .htaccess files, the reasons are:
- Web server performance is reduced.
- An .htaccess file modifies the server configuration. If you are the server administrator
this results in changes over which you have no control over.
With .htaccess files you can do the following:
More information can be found at:
http://httpd.apache.org/docs/2.0/howto/htaccess.html
Operating system used
Windows XP Home Edition Version 5.1 SP 2
Software prerequisites
Apache 2.0.49
Procedure
- Open the C:\Tools\Apache Group\Apache2\conf\httpd.conf file and enable
the use of .htaccess files by setting the following:
AccessFileName .htaccess
<Directory />
AllowOverride All
#AllowOverride None
</Directory>
Note 1:
The AllowOverride is valid only in <Directory> sections.
Note 2:
If AllowOverride is set to None, then the .htaccess files are completely ignored.
Note 3:
In the AllowOverride you can also specify which directive are allowed
to be overridden by the .htaccess file. For example:
AllowOverride ErrorDocument DirectoryIndex
In this example you can ONLY override the ErrorDocument and DirectoryIndex directives.
Note 4:
If you are using the VirtualHost directive, an example is given below where
to set the AllowOverride directive:
AccessFileName .htaccess
Listen 80
ServerAdmin [email protected]
ServerName www.mobilefish.com:80
DirectoryIndex index.html index.html.var index.shtm index.htm
NameVirtualHost 192.168.1.100
<VirtualHost 192.168.1.100:80>
ServerAdmin webmaster@mobilefish.com
DocumentRoot c:/mobilefish_web
ServerName www.mobilefish.com
ErrorLog logs/www.mobilefish.com-error_log
#TransferLog logs/www.mobilefish.com-access_log
CustomLog "|c:/weblogs/rotatelogs.exe
c:/weblogs/www.mobilefish.com-access_%y%m%d.log 86400" combined
<Directory "c:/mobilefish_web">
Options +Includes
AddType text/html shtm
AddOutputFilter Includes shtm
AllowOverride All
</Directory>
</VirtualHost>
View the updated httpd.conf file .
- Restart Apache.
- Here below are a few examples what you can do with the .htaccess file:
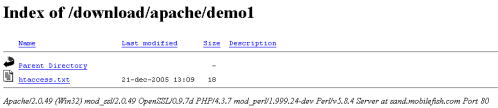
Turning directory listings on/off.
Step 1.
Put the following lines in an .htaccess file:
Options +Indexes
Options -Indexes
Note:
Turning directory listings on: Options +Indexes
Turning directory listings off: Options -Indexes

Specify custom error documents.
Step 1.
Put the following lines in an .htaccess file:
ErrorDocument 403 /error/403.html
ErrorDocument 404 /error/404.html
Note:
More information see quick guide:
Create custom error pages.
Enabling server-side includes.
Step 1.
Put the following lines in an .htaccess file:
Options +Includes
AddType text/html shtm
AddOutputFilter Includes shtm
Note 1:
Enable the mod_include module by uncommenting line:
LoadModule include_module modules/mod_include.so
Note 2:
The Options directive permit files to be parsed for SSI directives.
Note 3:
The AddType directive defines .shtm files as text/html mime types and indicates that
the resulting content is marked as HTML so that the browser displays it properly.
Note 4:
The AddOutputFilter tells Apache to treat every shtm file as one that
can include SSI commands and filters any output through mod_include.
Modifying the environment variables.
Step 1.
Put the following lines in an .htaccess file:
SetEnv WEBSITE_NAME "Mobilefish.com"
UnSetEnv REMOTE_ADDR
Step 2.
Create an html file containing the following lines:
<html>
<head>
<title>Demo</title>
</head>
<body>
<!--#echo var="WEBSITE_NAME" -->
</body>
</html>
Step 3.
Open a browser and access the html page. You will see the text "Mobilefish.com" in your browser.
Note 1:
With SetEnv you can explicitly set an environment variable.
UnSetEnv excludes variables from being set or passed.
Note 2:
If PassEnv and SetEnv are set
for a directory but a subdirectory cannot use the given variables,
you can use UnSetEnv to exempt the subdirectory from those variable settings.
Note 3:
An overview of Apache environment variables can be found in quick guide
"Environment variables".
Adding new MIME types.
Step 1.
Put the following lines in an .htaccess file:
AddType text/vnd.sun.j2me.app-descriptor .jad
AddType application/java-archive .jar
AddType application/octet-stream .bin
Note 1:
More information about MIME types can be found in the quick guide:
"MIME types".
Note 2:
To force a file to be downloaded, via the "Save As browser" feature, you can simply set
a MIME type to "application/octet-stream" and that immediately prompts you for the download.
Blocking users by ip addresses or domain names.
Step 1.
Put the following lines in an .htaccess file:
# Option 1:
order allow,deny
deny from 10.0.0.5
deny from 192.168.1.
deny from .xyzfoe.com
allow from all
#
# Option 2:
order deny,allow
deny from all
allow from 10.0.0.5
allow from 192.168.1.
allow from .xyzfoe.com
Step 2a. (Option 1 selected)
If you put the .htaccess file in the docroot then all users with ip address
10.0.0.5, 192.168.1.1, 192.168.1.2, etc. and domain name www.xyzfoe.com, test.xyzfoe.com, etc.
will be blocked. Everyone else can access to your site.
Watch out for the order sequence! First allow statements are executed then deny.
Step 2b. (Option 2 selected)
If you put the .htaccess file in the docroot then only users with ip address
10.0.0.5, 192.168.1.1, 192.168.1.2, etc. and domain name www.xyzfoe.com, test.xyzfoe.com, etc.
have access to your site. Everyone else will be blocked.
Watch out for the order sequence! First deny statements are executed then allow.
Prevent viewing of .htaccess file.
<Files .htaccess>
order deny,allow
deny from all
</Files>
Redirecting the client.
There are different types of redirections:
- permanent - the resource has moved permanently (status code: 301)
- temp - it has temporarily moved elsewhere (status code: 302)
- seeother - the resource has been replaced (status code: 303)
- gone - it has been permanently removed (status code: 410)
Using redirection types:
Redirect permanent /index.html https://www.mobilefish.com/home/ welcome/welcome.html
Redirect temp /index.html https://www.mobilefish.com/home/ welcome/welcome.html
Redirect seeother /index.html https://www.mobilefish.com/ home/welcome/welcome.html
Redirect gone /home/welcome
Using status codes:
Redirect 301 /index.html https://www.mobilefish.com/home/ welcome/welcome.html
Redirect 302 /index.html https://www.mobilefish.com/home/ welcome/welcome.html
Redirect 303 /index.html https://www.mobilefish.com/home/ welcome/welcome.html
Redirect 410 /home/welcome
It is recommended to use 301 instead of 302 especially if it concerns
your site main page. It seems that search engines like Google does not
like 302!
No type specified, default 302 is used:
Redirect /index.html https://www.mobilefish.com/home/ welcome/welcome.html
Redirecting a page:
Redirect 301 /index.html https://www.mobilefish.com/home/ welcome/welcome.html
Redirecting a directory:
Redirect 301 /home/welcome https://www.mobilefish.com/developer
Redirecting an entire site:
Redirect / http://newsite.mobilefish.com/
|
If you enter:
https://www.mobilefish.com/home/welcome/welcome.html
you will be redirected to:
http://newsite.mobilefish.com/home/welcome/welcome.html
If you wanted to be redirected to:
https://newsite.mobilefish.com
use this instead:
RewriteEngine on
RewriteRule (.*) https://newsite.mobilefish.com/
|
Rewriting the URL.
Example 1: Protect direct linking of images.
RewriteEngine on
RewriteCond %{HTTP_REFERER} !^$
RewriteCond %{HTTP_REFERER} !^https://(www\.)?mobilefish.com/.*$ [NC]
RewriteRule \.(jpg|gif)$ - [F]
Note:
All .gif or .jpg images from www.mobilefish.com are protected from direct linking.
Example 2: Show alternate image when someone links to your image.
RewriteEngine On
RewriteCond %{HTTP_REFERER} !^$
RewriteCond %{HTTP_REFERER} !^https://(www\.)?mobilefish\.com/ [NC]
RewriteRule \.(jpg|gif)$ images/question.gif [L]
Note:
The alternate image displayed is question.gif.
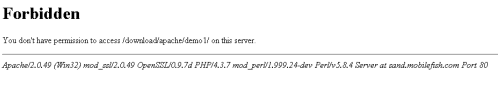
Example 3: Block traffic from a single referrer.
RewriteEngine on
RewriteCond %{HTTP_REFERER} www\.xyzfoe\.com [NC]
RewriteRule .* - [F]
Note:
Referrers from sites www.xyzfoe.com are blocked.
They will see a 403 Forbidden error page.
Example 4: Block traffic from a multiple referrers.
RewriteEngine on
RewriteCond %{HTTP_REFERER} www\.xyzfoe\.com [NC,OR]
RewriteCond %{HTTP_REFERER} abcfoe\.com
RewriteRule .* - [F]
Note:
Referrers from sites www.xyzfoe.com or abcfoe.com are blocked.
They will see a 403 Forbidden error page.
Password protecting directories.
Step 1.
Enable the mod_auth module by uncommenting line:
LoadModule auth_module modules/mod_auth.so
Step 2.
Create a directory C:/mobilefish_web/secure
Step 3.
Create file C:/mobilefish_web/secure/test.html, containing the following lines:
<html>
<head>
<title>Secure Page</title>
</head>
<body>
<h1>Secure Page </h1>
</body>
</html>
Step 4.
Put the following lines in an .htaccess file:
AuthType Basic
AuthName "For Members Only"
AuthUserFile C:/mobilefish_web/secure/.htpasswd
AuthGroupFile /dev/null
require valid-user
#
# Option 1: Allow from specific ip addresses and NO login required
#allow from 127.0.0.1
#allow from 10.0.0.3
#satisfy any
#
# Option 2: Allow from specific ip addresses and login required
#allow from 127.0.0.1
#allow from 10.0.0.3
#satisfy all
Note 1:
The AuthUserFile contains the location of the .htpasswd file.
You must enter the absolute SYSTEM path (NOT the path starting from the docroot).
Note 2:
For security reasons it is NOT recommended to put the .htpasswd file
inside your docroot.
Note 3:
You can also grant/restrict access to the password protected directory
based on IP addresses. Uncomment the lines below Option 1 or 2
depending if the users from the specified ip addresses are required to login or not.
Note 4:
"require valid-user" means that every user in the htpasswd file has access
to this protected directory. If you only want user "jim" to have access to this directory
replace line "require valid-user" with:
require user jim
Step 5.
Create the .htpasswd file using the online .htaccess and .htpasswd generator
or create it yourself, type:
htpasswd -c .htpasswd username
Example:
C:\Tools\Apache Group\Apache2\bin>htpasswd -c .htpasswd guest
Automatically using MD5 format.
New password: ********
Re-type new password: ********
Adding password for user guest
To add additional users to this file, type:
htpasswd .htpasswd new_username
Example:
C:\Tools\Apache Group\Apache2\bin>htpasswd .htpasswd guest2
Automatically using MD5 format.
New password: *********
Re-type new password: *********
Adding password for user guest2
To delete users from this file, type:
htpasswd -D .htpasswd username
Example:
C:\Tools\Apache Group\Apache2\bin>htpasswd -D .htpasswd guest2
Automatically using MD5 format.
Deleting password for user guest2
Note 1:
Upload the .htpasswd files using the ASCII mode.
Note 2:
For security reasons it is NOT recommended to put the .htpasswd file
inside your docroot.
Step 6.
Put the .htaccess and .htpasswd files in the C:/mobilefish_web/secure directory.
Step 7.
Type: https://www.mobilefish.com/secure/index.html
Step 8.
A popup window will open.
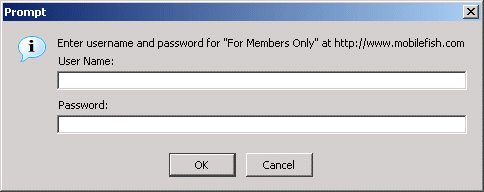
Step 9.
Enter your User Name and Password.
Step 10.
The index.html page will be displayed.
Compress certain files (mod_deflate.so is enabled)
Step 1.
Make sure mod_deflate.so is enabled as described in tutorial HTTP compression.
Step 2.
Put the following lines in an .htaccess file:
<IfModule mod_deflate.c>
<FilesMatch "\.(js|css|php|html|shtm|htm|txt|xml)$">
SetOutputFilter DEFLATE
</FilesMatch>
</IfModule>
|
|