Apache is a powerful and flexible HTTP/1.1 compliant
web server. Originally designed as a replacement for the NCSA HTTP
Server, it has grown to be the most popular web server on the
Internet. As a project of the Apache Software Foundation, the
developers aim to collaboratively develop and maintain a robust,
commercial-grade, standards-based server with freely available
source code.
The Apache HTTP Server is distributed at no charge for
commercial or non-commercial use. For more information read the LICENSE.txt file.
Apache can be used with Microsoft Windows. The
Apache HTTP Server Version 2.0 runs under Windows NT, Windows 2000 and
Windows XP. You should download the version of Apache for Windows with
the .msi extension. This is a single Microsoft Installer file containing Apache,
ready to install and run.
The latest Apache HTTP Server version can be downloaded from:
http://httpd.apache.org/
The latest Apache 1.3 documentation can be found at:
http://httpd.apache.org/docs/1.3/
The latest Apache 2.0 documentation can be found at:
http://httpd.apache.org/docs/2.0/
The latest Apache 2.2 documentation can be found at:
http://httpd.apache.org/docs/2.2/
Setup Apache in macOS Sierra with PHP, Server Side Includes and name-based virtual hosting
Information
This tutorial setup two apache web projects (mobilefish_web and mypark_web) on a macOS.
It will host two domains (sand.mobilefish.com and sand.mypark.nl) using name-based virtual hosting.
Apache will be configured for PHP and server side includes.
Operating system used
macOS Sierra
Software prerequisites
none
Procedure
- Open a terminal and goto your homedirectory.
- Type: mkdir Sites
- Create two web projects called "mobilefish_web" and "mypark_web".
Type: cd Sites
Type: mkdir mobilefish_web
Type: mkdir mypark_web
- Create file ~/Sites/mobilefish_web/index.html with the following content:
<html>
<head><title>mobilefish_web</title></head>
<body>mobilefish_web</body>
</html>
- Create file ~/Sites/mypark_web/index.html with the following content:
<html>
<head><title>mypark_web</title></head>
<body>mypark_web</body>
</html>
- Verify your username.
Type: whoami
You should see for example:
robertlie
- Create an username.conf file, for example: robertlie.conf
Type: cd /etc/apache2/users
Type: sudo nano robertlie.conf
This file has the following content:
<Directory "/Users/robertlie/Sites/">
Options Indexes MultiViews FollowSymLinks Includes
AllowOverride All
Order allow,deny
Allow from all
Require all granted
AddType text/html .shtml .shtm .html
AddOutputFilter INCLUDES .shtml .shtm .html
AddType application/x-httpd-php .html
</Directory>
- Set the file permission.
Type: sudo chmod 644 robertlie.conf
- Modify the /etc/apache2/httpd.conf file (Make a backup of this file first!)
Make the following changes, uncomment the following lines:
LoadModule include_module libexec/apache2/mod_include.so
LoadModule deflate_module libexec/apache2/mod_deflate.so
LoadModule expires_module libexec/apache2/mod_expires.so
LoadModule vhost_alias_module libexec/apache2/mod_vhost_alias.so
LoadModule userdir_module libexec/apache2/mod_userdir.so
LoadModule rewrite_module libexec/apache2/mod_rewrite.so
LoadModule php5_module libexec/apache2/libphp5.so
# User home directories
Include /private/etc/apache2/extra/httpd-userdir.conf
# Virtual hosts
Include /private/etc/apache2/extra/httpd-vhosts.conf
- When you enter sand.mobilefish.com it should automatically load page index.shtm or index.html.
Modify the following:
<IfModule dir_module>
DirectoryIndex index.shtm index.html
</IfModule>
Note:
Check if the httpd.conf does not contain errors, type: apachectl configtest
- In the httpd.conf file the user/group is set.
User _www
Group _www
If you have setup a local Apache environment for development purpose, it is best to set User to your accountname, for example:
User robertlie
Group _www
Why you want to do this:
If you let users to upload a file to your webserver and you want to modify this file using a PHP script than setting the User to your accountname
will solve many problems. Do not do this for production environment!
- Modify the /etc/apache2/extra/httpd-userdir.conf file (Make a backup of this file first!)
Make the following changes, uncomment the following line:
Include /private/etc/apache2/users/*.conf
- Modify the /etc/apache2/extra/httpd-vhosts.conf file (Make a backup of this file first!)
Add the following lines:
<VirtualHost *:80>
DocumentRoot "/Users/robertlie/Sites/mobilefish_web"
ServerName sand.mobilefish.com
ErrorLog "/private/var/log/apache2/sand-mobilefish-error.log"
CustomLog "/private/var/log/apache2/sand-mobilefish-access.log" common
</VirtualHost>
<VirtualHost *:80>
DocumentRoot "/Users/robertlie/Sites/mypark_web"
ServerName sand.mypark.nl
ErrorLog "/private/var/log/apache2/mypark-error.log"
CustomLog "/private/var/log/apache2/mypark-access.log" common
</VirtualHost>
- Check the Apache configuration.
Type: sudo apachectl configtest
Note:
sudo apachectl -t does the same.
- Edit /etc/hosts file. Add at the bottom of the file the following lines:
#Local sites
127.0.0.1 sand.mobilefish.com
127.0.0.1 sand.mypark.nl
- Restart apache
Type: sudo apachectl restart
Note:
Stop Apache, type: sudo apachectl stop
Start Apache, type: sudo apachectl start
Show Apache version, type: httpd -v
You will see, for example:
Server version: Apache/2.4.23 (Unix)
Server built: Aug 8 2016 18:10:45
- Open a browser.
Type: http://sand.mobilefish.com
Type: http://sand.mypark.nl
- If your website allows you to upload files, you need to make the follwing changes:
- Make sure your /etc/php.ini allows you to upload files.
Checkout the following settings:
- file_uploads = On
Allow HTTP file uploads.
- ;upload_tmp_dir =
Temporary directory for HTTP uploaded files.
Will use system default /private/var/tmp/ if not specified.
- upload_max_filesize = 2M
Maximum allowed size for uploaded files.
- max_file_uploads = 20
Maximum number of files that can be uploaded via a single request.
- By default the uploaded files are stored in folder /private/var/tmp/
You need to move these files to another folder (for example docroot/tmp) to access these files from a webpage.
Use the php command move_uploaded_file() to move the files from /private/var/tmp/ to docroot/tmp
Note:
The file is removed immediately from /private/var/tmp/ after the upload is done.
Which mean you will not see this file in /private/var/tmp/.
- Make sure the following groups and permissions are set:
- chmod go-rwx docroot (only owner has access to docroot)
- chmod go+x docroot (groups and others can access the docroot)
- sudo chgrp -R _www docroot (all content belongs to group _www)
- chmod -R go-rwx docroot (only owner has access to docroot)
- chmod -R g+rx docroot (only owner and _www has access to docroot)
- chmod -R g+rwx docroot/tmp (_www has write access to the tmp)
Note:
When a file is uploaded to /private/var/tmp/ and moved to docroot/tmp folder,
the file is created by user _www (and group _www).
This user and group is set in the /etc/apache2/httpd.conf file.
- The following steps are needed if you want to setup SSL.
- Stop apache server.
Type: sudo apachectl stop
- Edit the httpd.conf file:
- Uncomment line:
LoadModule socache_shmcb_module libexec/apache2/mod_socache_shmcb.so
- Uncomment line: LoadModule ssl_module libexec/apache2/mod_ssl.so
- Uncomment line: Include /private/etc/apache2/extra/httpd-ssl.conf
- Create folder /etc/apache2/ssl
Type: sudo mkdir /private/etc/apache2/ssl
- If you ONLY want to support https://www.mobilefish.com than continue otherwise skip this step.
Modify the /etc/apache2/extra/httpd-vhosts.conf file (Make a backup of this file first!)
In this example the site sand.mobilefish.com will be SSL enabled and it will ONLY support SSL.
It will not support http://sand.mobilefish.com
Comment out the following lines:
#<VirtualHost *:80>
# DocumentRoot "/Users/robertlie/Sites/mobilefish_web"
# ServerName sand.mobilefish.com
# ErrorLog "/private/var/log/apache2/sand-mobilefish-error.log"
# CustomLog "/private/var/log/apache2/sand-mobilefish-access.log" common
#</VirtualHost>
- Backup the /etc/apache2/extra/httpd-ssl.conf file.
An example VirtualHost is already setup in httpd-ssl.conf. Comment is all out!
#<VirtualHost _default_:443>
#SSLEngine on
#SSLCertificateFile "/private/etc/apache2/server.crt"
#SSLCertificateKeyFile "/private/etc/apache2/server.key"
#DocumentRoot "/Library/WebServer/Documents"
#ServerName www.example.com:443
#ServerAdmin [email protected]
#ErrorLog "/private/var/log/apache2/error_log"
#TransferLog "/private/var/log/apache2/access_log"
#<FilesMatch "\.(cgi|shtml|phtml|php)$">
# SSLOptions +StdEnvVars
#</FilesMatch>
#<Directory "/Library/WebServer/CGI-Executables">
# SSLOptions +StdEnvVars
#</Directory>
#BrowserMatch "MSIE [2-5]" \
# nokeepalive ssl-unclean-shutdown \
# downgrade-1.0 force-response-1.0
#CustomLog "/private/var/log/apache2/ssl_request_log" \
# "%t %h %{SSL_PROTOCOL}x %{SSL_CIPHER}x \"%r\" %b"
#</VirtualHost>
- At the end of the httpd-ssl.conf file add the following lines:
<VirtualHost *:443>
DocumentRoot "/Users/robertlie/Sites/mobilefish_web"
ServerName sand.mobilefish.com
ErrorLog "/private/var/log/apache2/sand-mobilefish-error.log"
CustomLog "/private/var/log/apache2/sand-mobilefish-access.log" common
SSLEngine on
SSLCertificateFile "/private/etc/apache2/ssl/sand.mobilefish.crt"
SSLCertificateKeyFile "/private/etc/apache2/ssl/sand.mobilefish.key"
<FilesMatch "\.(cgi|shtml|shtm|phtml|php)$">
SSLOptions +StdEnvVars
</FilesMatch>
<Directory "/Library/WebServer/CGI-Executables">
SSLOptions +StdEnvVars
</Directory>
</VirtualHost>
- Create a self signed SSL certificate for domain sand.mobilefish.com.
There are two ways to do this.
- Method A: Create a self signed SSL certificate. (Not recommended)
- Method B: Create a self signed SSL certificate issued by a Certificate Authority (CA).
Choose method B if you want to use the PHP SSL context options
"verify_peer" and "verify_peer_name". You need the CA certificate.
See: Installing PHP5.6.30 on macOS Sierra
Method A: Create a self signed SSL certificate
- Type: cd /private/etc/apache2/ssl
- Create the server private key and server certificate.
Type: sudo openssl req -x509 -nodes -days 3650 -newkey rsa:2048 -keyout sand.mobilefish.key -out sand.mobilefish.crt
Note: The certificate will be valid for 10 years, this is just for a test environment!
- Enter the following information:
Country Name (2 letter code) [AU]:NL
State or Province Name (full name) [Some-State]:Noord-Holland
Locality Name (eg, city) []:Zaandam
Organization Name (eg, company) [Internet Widgits Pty Ltd]:Mobilefish.com
Organizational Unit Name (eg, section) []:Research and development
Common Name (e.g. server FQDN or YOUR name) []:sand.mobilefish.com
Email Address []:[email protected]
- The folowing files are created:
/private/etc/apache2/ssl/sand.mobilefish.key (this is the server private key)
/private/etc/apache2/ssl/sand.mobilefish.crt (this is the server certificate)
Method B: Create a self signed SSL certificate issued by a Certificate Authority (CA)
- Type: cd /private/etc/apache2/ssl
- First create a 2048 bit CA private key.
Type: sudo openssl genrsa -out privkey.pem 2048
You will see the following:
Generating RSA private key, 2048 bit long modulus
..............................................+++
...........+++
e is 65537 (0x10001)
- The following file is created:
/private/etc/apache2/ssl/privkey.pem (this is the CA private key)
- Create a self signed CA certificate.
Type: sudo openssl req -new -x509 -days 3650 -nodes -key privkey.pem -sha256 -out ca.pem
Enter the following information:
You are about to be asked to enter information that will be incorporated
into your certificate request.
What you are about to enter is what is called a Distinguished Name or a DN.
There are quite a few fields but you can leave some blank
For some fields there will be a default value,
If you enter '.', the field will be left blank.
-----
Country Name (2 letter code) [AU]:NL
State or Province Name (full name) [Some-State]:Noord-Holland
Locality Name (eg, city) []:Zaandam
Organization Name (eg, company) [Internet Widgits Pty Ltd]:Mobilefish.com CA
Organizational Unit Name (eg, section) []:
Common Name (e.g. server FQDN or YOUR name) []:
Email Address []:
- The following file is created:
/private/etc/apache2/ssl/ca.pem (this is the CA certificate)
- Create a server configuration file /private/etc/apache2/ssl/sand.mobilefish.csr.cnf containing the following lines:
[req]
default_bits = 2048
prompt = no
default_md = sha256
distinguished_name = dn
[dn]
C=NL
ST=Noord-Holland
L=Zaandam
O=End Point
OU=Research and development
[email protected]
CN = sand.mobilefish.com
- Create the server Certificate Signing Request and server private key.
Type: sudo openssl req -new -nodes -out sand.mobilefish.csr -keyout sand.mobilefish.key -config sand.mobilefish.csr.cnf
You will see the following:
Generating a 2048 bit RSA private key
.................................................+++
....................+++
writing new private key to 'sand.mobilefish.key'
-----
- The following files are created:
/private/etc/apache2/ssl/sand.mobilefish.csr (this is the server certificate signing request)
/private/etc/apache2/ssl/sand.mobilefish.key (this is the server private key)
- Create a server extension file /private/etc/apache2/ssl/sand.mobilefish_v3.ext containing the following lines:
authorityKeyIdentifier=keyid,issuer
basicConstraints=CA:FALSE
keyUsage = digitalSignature, nonRepudiation, keyEncipherment, dataEncipherment
subjectAltName = @alt_names
[alt_names]
DNS.1 = sand.mobilefish.com
Note 1:
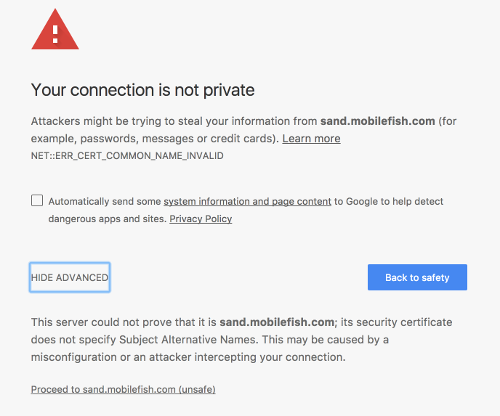
This is step is needed if you want to avoid the following error in Chrome browser:
This server could not prove that it is sand.mobilefish.com; its security certificate
does not specify Subject Alternative Names. This may be caused by a
misconfiguration or an attacker intercepting your connection.
Note 2:
Make sure the domain "DNS.1 = sand.mobilefish.com" is the same as "CN = sand.mobilefish.com" in file sand.mobilefish.csr.cnf.
Note 3:
If you want this certificate to support multiple domains, do the following:
[alt_names]
DNS.1 = sand.mobilefish.com
DNS.2 = proxy.mobilefish.com
DNS.3 = baidu.com
DNS.4 = china.com
- Create the server certificate.
Type: sudo openssl x509 -req -in sand.mobilefish.csr -CA ca.pem -CAkey privkey.pem -CAcreateserial -out sand.mobilefish.crt -days 3650 -extfile sand.mobilefish_v3.ext
You will see the following:
Signature ok
subject=/C=NL/ST=Noord-Holland/ L=Zaandam/O=End Point/OU=Research and development/ [email protected]/ CN=sand.mobilefish.com
Getting CA Private Key
- The following file is created:
/private/etc/apache2/ssl/sand.mobilefish.crt (this is the server certificate)
- Check the Apache configuration.
Type: sudo apachectl configtest
Note:
sudo apachectl -t does the same.
- Start Apache server.
Type: sudo apachectl start
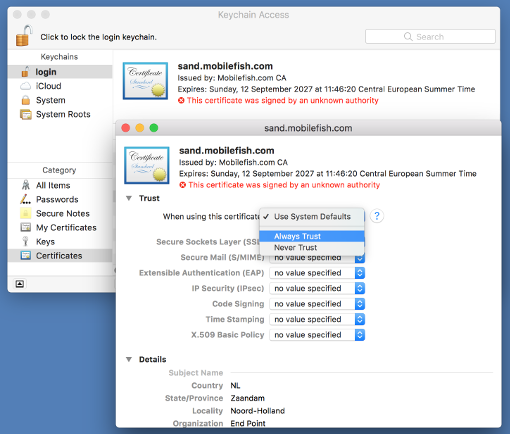
- The following steps applies to Mac users. How it is done on other OS I do not know (sorry..).
The sand.mobilefish.crt certificate is self signed and is not created by an official CA Authority.
To always trust our own self signed certificate:
- Right click file sand.mobilefish.crt and select "Open With" and select "Keychain Access".
- Open the "Keychain Access" app if it does not open.
- Double click the certificate sand.mobilefish.com.
- Expand Trust.
- Select "When using this certificate" Always Trust.
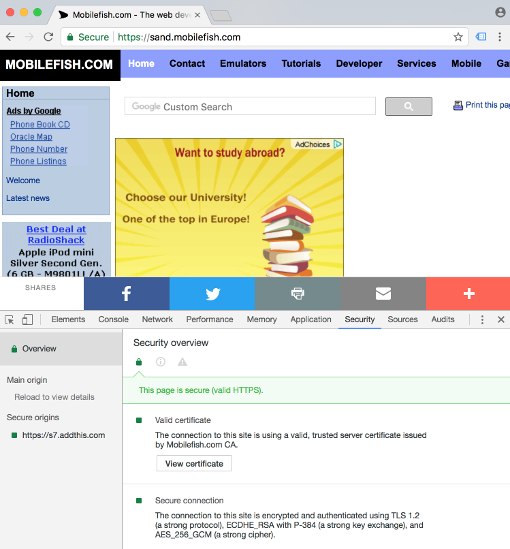
- Open Chrome browser.
Type: https://www.mobilefish.com
- Right click the Mobilefish.com homepage, select Inspect and select tab Security.
The site is secure and the certificate is valid.
|
|