OpenSSL


The OpenSSL Project has developed a open source toolkit implementing the Secure Sockets Layer (SSL v2/v3) and Transport Layer Security TLS (v1) protocols as well as a full-strength general purpose cryptography library.

OpenSSL is based on the SSLeay library developed by Eric A. Young and Tim J. Hudson. The OpenSSL toolkit is licensed under an Apache-style licence, which basically means that you are free to get and use it for commercial and non-commercial purposes subject to some simple license conditions.

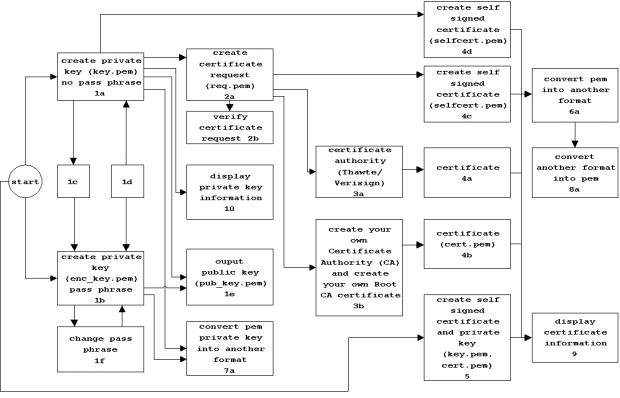
The OpenSSL toolkit can be used to generate the keys that a web server (e.g. Apache) needs to encrypt the data sent between the client (browser) and the web server.
A simple overview of this process can be found here below:
  • A client browser connects to the Apache HTTP server via a Web request.

  • The browser asks to start a secure session with the server.

  • The server returns the site's certificate (= mobilefish.com_cert.pem) which also includes the server public key.

  • The browser analyzes the certificate and informs the user about its validity (e.g., was it issued by a recognized, trusted certificate authority?).

  • The browser creates a session key, which is encrypted with the server's public key, which is then sent to the server. This public or asymmetric key is generally 1024 bits. Much stronger public keys of 2048 bits could be provided but, perhaps for performance reasons, these are not in general use.

  • The server then decrypts this information using its private key (mobilefish.com_key.pem).

  • Both the browser and the server now are using the same session key. This is a symmetric key used to encrypt and decrypt data exchanged by the browser and server. Browsers and servers usually negotiate the strongest mutually supported session. This means that if the user's browser and your Web server both support 128-bit SSL sessions, a 128-bit session is established. If the user's browser only supports 40-bit SSL sessions, then a 40-bit session is established even if your Web server supports 128-bit sessions.

More information about the OpenSSL Project can be found at:
http://www.openssl.org

The latest OpenSSL version (no binary distributions) can be downloaded from:
http://www.openssl.org/source/

Links to OpenSSL binary distributions can be found at:
http://www.openssl.org/related/binaries.html


Command examples


Information
none

Operating system used
Windows XP Home Edition Version 5.1 SP 2

Software prerequisites
OpenSSL v0.9.7d or higher

Procedure

Openssl overview


Step 1a. Create key (not password protected)

The private key will remain on the server and should never be released into the public.
  • Generating RSA private key, 1024 bit.

    C:\Tools\OpenSSL\bin>openssl genrsa -out key.pem 1024

    Note 1: Backup your key.pem
    Note 2: If you did not specify 1024, a 512 bit key is generated (default value).


Step 1b. Create key (password protected)

The private key will remain on the server and should never be released into the public.
  • Generating encrypted (triple DES) RSA private key, 1024 bit.

    C:\Tools\OpenSSL\bin>openssl genrsa -des3 -out enc_key.pem 1024

    Note 1: Backup your enc_key.pem and make a note of the passphrase.
    Note 2: The enc_key.pem file contains the line "DEK-Info: DES-EDE3-CBC" (=triple DES).
    Note 3: If you did not specify 1024, a 512 bit key is generated (default value).


Step 1c. Encrypt an unecrypted private key using triple DES

  • Encrypt an unencrypted RSA private key using triple DES.

    C:\Tools\OpenSSL\bin>openssl rsa -des3 -in key.pem -out enc_key.pem

    Note: The enc_key.pem file contains the line "DEK-Info: DES-EDE3-CBC" (=triple DES).


Step 1d. Remove the pass phrase from the ecrypted private key

  • Remove the pass phrase from the ecrypted private key.

    C:\Tools\OpenSSL\bin>openssl rsa -in enc_key.pem -out key.pem

    Note: You need the pass phrase of enc_key.pem.


Step 1e. To output the public key part of a private key

  • To output the public key part of a private key.

    C:\Tools\OpenSSL\bin>openssl rsa -in key.pem -pubout -out pub_key.pem


Step 1f. To change the pass phrase of an encrypted private key.

  • To change the pass phrase of an encrypted private key.

    C:\Tools\OpenSSL\bin>openssl rsa -des3 -in enc_key.pem

    Note: The pass phrase of enc_key.pem will be changed.


Step 2a. Create certification request

A certificate request contains a public key and can only be generated using the private key file.
  • Generating certificate request.

    C:\Tools\OpenSSL\bin>openssl req -new -key key.pem -out req.pem

  • Generating certificate request using encrypted RSA private key.

    C:\Tools\OpenSSL\bin>openssl req -new -key enc_key.pem -out req.pem

    Note: req.pem contains the certificate request.


Step 2b. Verify certificate request

  • To display certificate request information.

    C:\Tools\OpenSSL\bin>openssl req -in req.pem -noout -text

  • To verify the certificate request.

    C:\Tools\OpenSSL\bin>openssl req -verify -in req.pem -noout -text

  • To verify the signature.

    C:\Tools\OpenSSL\bin>openssl req -verify -in req.pem -key key.pem -noout -text


Step 3a. Send certificate request to Certification Authority (CA)

Never send your private key to the CA.
  • Send certificate request req.pem to a CA.


Step 3b. Create your own Certificate Authority (CA) and create your own Root CA certificate.

First setup up your own Certification Authority (CA), follow quick guide
"Create your own Root Certification Authority (CA) certificate".
  • Create certificate signed by your own Certification Authority (CA).

    C:\Tools\OpenSSL\bin>openssl ca -in req.pem -out cert.pem


Step 4a. Receive certificate from Certification Authority (CA)

  • The certificate from a **real** CA (= e.g. Thawte, Verisign etc.) does not display a warning message to the users.


Step 4b. Receive certificate from your own created Certification Authority (CA)

  • The certificate from your **own** CA (= e.g. Mobilefish.com CA.) does display a warning message to the users.

    It is recommended only to use this certificate on intranet sites or sites not for public use.


Step 4c. Create self-signed certificate

  • Create self-signed certificate.

    C:\Tools\OpenSSL\bin>openssl req -x509 -key key.pem -in req.pem -out selfcert.pem -days 365


Step 4d. Create self-signed certificate

  • Create self-signed certificate.

    C:\Tools\OpenSSL\bin>openssl req -x509 -new -key key.pem -out selfcert.pem -days 365


Step 5. Create private key and self-signed certificate in one go

  • Create both the private key (1024 bit) and the self-signed certificate based on it. The certificate will be valid for 365 days and the private key will be unencrypted (-nodes).

    C:\Tools\OpenSSL\bin>openssl req -x509 -nodes -days 365 -newkey rsa:1024 -keyout key.pem -out selfcert.pem

  • Create both the private key (1024 bit) and the self-signed certificate based on it. The certificate will be valid for 365 days and the private key will be encrypted.

    C:\Tools\OpenSSL\bin>openssl req -x509 -days 365 -newkey rsa:1024 -keyout enc_key.pem -out selfcert.pem


Step 6a. Convert a PEM certificate into another format

PEM to PKCS#12
  • Convert a PEM certificate into PKCS#12 format. The PKCS#12 file is not an ASCII file.

    C:\Tools\OpenSSL\bin>openssl pkcs12 -export -in cert.pem -inkey key.pem -certfile demoCA/cacert.pem -out cert.p12
PEM to PFX
  • Convert a PEM certificate into PFX format. The PFX file is not an ASCII file.
    Note: PFX format is the same as PKCS#12 format.

    C:\Tools\OpenSSL\bin>openssl pkcs12 -export -in cert.pem -inkey key.pem -certfile demoCA/cacert.pem -out cert.pfx
PEM to PKCS#7
  • Convert a PEM certificate into PKCS#7 format. The PKCS#7 file is not an ASCII file.

    C:\Tools\OpenSSL\bin>openssl crl2pkcs7 -nocrl -certfile cert.pem -certfile demoCA/cacert.pem -outform DER -out cert.p7c

    Note 1: cacert.pem is the CA certificate.
    Note 2: cert.p7c has the DER format (-outform DER).
PEM to DER
  • Convert a PEM certificate into DER format. The DER file is not an ASCII file.

    C:\Tools\OpenSSL\bin>openssl x509 -in cert.pem -outform DER -out cert.der


Step 7a. Convert a PEM private key into another format

PEM to DER
  • Convert a PEM private key into DER format. This is not an ASCII file.

    C:\Tools\OpenSSL\bin>openssl rsa -in key.pem -outform DER -out key.der
PEM to PKCS#8
  • Convert a PEM private key into PKCS#8. This is not an ASCII file.

    In this example the cakey.pem will be converted into a cakey.p8c file.
    First remove the password:

    C:\Tools\OpenSSL\bin>openssl rsa -in demoCA/private/cakey.pem -out cakeyout.pem

    Now convert PEM private key into PKCS#8:

    C:\Tools\OpenSSL\bin>openssl pkcs8 -in cakeyout.pem -topk8 -v2 des3 -nocrypt -outform DER -out cakey.p8c

    Note: cakey.p8c has the DER format (-outform DER).

    To validate if the cakey.p8c is a proper private key wrapped in a pkcs8 encoding enter the following two commands:

    Command 1:

    C:\Tools\OpenSSL\bin>openssl pkcs8 -inform der -nocrypt -in cakey.p8c

    You should see something like this:

    -----BEGIN RSA PRIVATE KEY-----
    :
    -----END RSA PRIVATE KEY-----


    Command 2:

    C:\Tools\OpenSSL\bin>openssl asn1parse -inform der -in cakey.p8c

    You should see something like this:

     0:d=0   hl=4   l= 630 cons:   SEQUENCE
     4:d=1   hl=2   l=   1 prim:   INTEGER :00
     7:d=1   hl=2   l=   3 cons:   SEQUENCE
     9:d=2   hl=2   l=   9 prim:   OBJECT :rsaEncryption
    20:d=2   hl=2   l=   0 prim:   NULL
    22:d=1   hl=4   l= 608 prim:   OCTET STRING


Step 8a. Convert a certificate in another format into PEM format

PKCS#7 to PEM
  • Convert a pkcs#7 certificate into PEM format.

    C:\Tools\OpenSSL\bin>openssl pkcs7 -in cert.p7c -inform DER -outform PEM -out cert.pem

    Note 1: cert.p7c has the DER format (-inform DER).


Step 9. Display certificate information

PEM
  • Display certificate information.

    C:\Tools\OpenSSL\bin>openssl x509 -in cert.pem -noout -text

  • Who issued the certificate?

    C:\Tools\OpenSSL\bin>openssl x509 -in cert.pem -noout -issuer

  • To whom was it issued?

    C:\Tools\OpenSSL\bin>openssl x509 -in cert.pem -noout -subject

  • For what dates is it valid and what is it hash value?

    C:\Tools\OpenSSL\bin>openssl x509 -in cert.pem -noout -dates -hash

  • What is its MD5 fingerprint?

    C:\Tools\OpenSSL\bin>openssl x509 -in cert.pem -noout -fingerprint

  • What is its SHA1 fingerprint?

    C:\Tools\OpenSSL\bin>openssl x509 -in cert.pem -noout -sha1 -fingerprint
PKCS#12
  • Display certificate information.

    • C:\Tools\OpenSSL\bin>openssl pkcs12 -in cert.p12

    • C:\Tools\OpenSSL\bin>openssl pkcs12 -in cert.p12 -noout -info
PKCS#7
  • Display certificate information.

    C:\Tools\OpenSSL\bin>openssl pkcs7 -inform DER -in cert.p7c

    Note: cert.p7c has the DER format (-inform DER).
DER
  • Display certificate information.

    • C:\Tools\OpenSSL\bin>openssl x509 -inform DER -in cert.der -noout -text


Step 10. Display private key information

PEM
  • Display private key information.

    C:\Tools\OpenSSL\bin>openssl rsa -in key.pem -noout -text
DER
  • Display private key information.

    C:\Tools\OpenSSL\bin>openssl rsa -inform DER -in key.der -noout -text
PKCS#8
  • Display private key information.

    C:\Tools\OpenSSL\bin>openssl pkcs8 -inform DER -in cert.p8c

    Note: cert.p8c has the DER format (-inform DER).


Step 11. Other useful commands

  • Display openssl version.

    C:\Tools\OpenSSL\bin>openssl version