3D Studio Max (3dsmax) is a 3D modeling, animation, and rendering tool.
It is owned by Autodesk, an United States (San Rafael, California) based company.
More information about 3D Studio Max can be found at: http://www.autodesk.com/3dsmax/
Note: A free 30 days trial version can be downloaded from the Autodesk site.
Some 3D Studio Max forums:
Materials.
Information
The information below is based on 3D Studio Max 7.
Procedure
Apply a material to an object
- Open the Material Editor
 or
press M-key. or
press M-key.
- Select a sample slot
 . .
Sample slots displays previews of materials.
To increase the number of sample slots visible at once, right-click a slot and then choose
n X m Sample Windows from the pop-up menu.
An active slot has a white outline.
A sample slot will have small triangles in their corners when it represent a material
that has been applied to an object in the scene.
A sample slot will have small white triangles in their corners when it represent a material
that has been applied to an object in the scene and the object is currently selected.
- Enter a descriptive name in the box
 for the material you are about to design.
- The "Standard" button next to the box indicates that the Standard material type is being used.
If you want to change this, press this button and the Material/Map Browser is displayed.
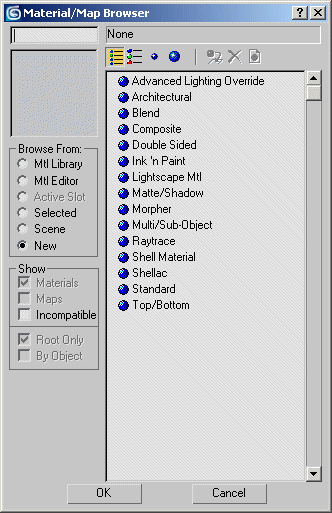
| Advanced Lighting Override |
Used to fine-tune the effects of a material on Advanced Lighting,
including light tracing and radiosity solutions. Radiosity Override is not
required for calculating advanced lighting, but it can enhance the result.
|
| Architectural |
Architectural material are physical properties, so it provides the greatest
possible realism when used with photometric lights and radiosity.
|
| Blend |
Mixes two other materials together. Can use a mask or a simple amount control.
|
| Composite |
Mixes up to 10 materials.
|
| Double Sided |
Contains two materials, one for the front and one for the back faces of an object.
|
| Ink 'n Paint |
Creates cartoon effects with flat shading and "inked" borders.
|
| Lightscape Mtl |
Supports import and export of data from the Lightscape product.
|
| Matte/Shadow |
Displays the environment but receives shadows. This is a special-purpose material. The effect is similar to using a matte in filmmaking.
|
| Morpher |
Lets you morph between materials using the Morpher modifier.
|
| Multi/Sub-Object |
Lets you apply multiple sub-materials to a single object's sub-objects.
|
| Raytrace |
Supports the same kind of diffuse mapping as Standard material, but also provides fully raytraced reflections and refractions, along with other effects such as fluorescence.
|
| Shell Material |
Contains a material that has been rendered to a texture, as well as the original material upon which the texture is based.
|
| Shellac |
Mixes two materials by applying a "shellac" material to another.
|
| Standard |
Is the default material in the Material Editor sample slots.

|
| Top/Bottom |
Contains two materials, one for faces that point upward, the other for faces that point downward.
Standard materials let you set a material's color components, and other components such as glossiness or opacity. They also let you apply maps to the components, which can give you an enormous variety of effects. Some other material types have these features as well. Some, like multi/sub-object or double-sided, only have controls for combining other materials.
|
- This quick guide will only explain the usage of Standard material which you will probably use most often.
Press Cancel button if the Material/Map Browser is displayed.
- Goto the Shader Basic Parameters rollout and open the drop down list.
Choose the type of shader to use with a Standard material.
In this quick guide the Blinn shader is used.
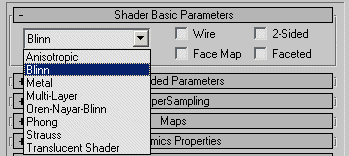
There are several different shaders. Some are named for what they do; others are named for their creators. These are the basic material shaders:
| Anisotropic |
For surfaces with elliptical, "anisotropic" highlights. These highlights are good for modeling hair, glass, or brushed metal.
|
| Blinn |
Creates smooth surfaces with some shininess; a general-purpose shader.
|
| Metal |
For metallic surfaces.
|
| Multi-Layer |
Creates more complex highlights than Anisotropic by layering two anisotropic highlights.
Not available for Raytrace material.
|
| Oren-Nayar-Blinn |
Creates good matte surfaces such as fabric or terra-cotta; similar to Blinn.
|
| Phong |
Creates smooth surfaces with some shininess; similar to Blinn, but doesn't handle highlights (especially glancing highlights) as well.
|
| Strauss |
Creates both nonmetallic and metallic surfaces; has a simple set of controls.
Not available for Raytrace material.
|
| Translucent Shader |
Translucent shading is similar to Blinn shading, but it also lets you specify translucency, where light is scattered as it passes through the material. You can use translucency to simulate frosted and etched glass.
Not available for the Raytrace material.
|
Note: Shaders can only be selected if you choose the Standard or Raytrace material type.
- Goto the Blinn Basic Parameters rollout which contains controls that let you set the color
of your material.
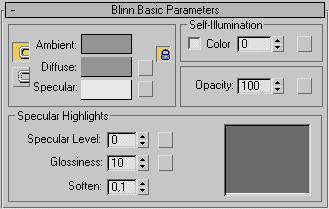
A Standard material type has three color controls. By changing these,
the surface reflective properties is changed.
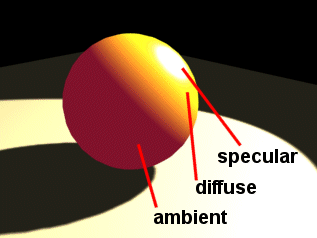
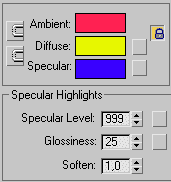
| Ambient color |
Ambient color is the color
what the object reflects when illuminated by ambient light rather than direct light.
Note: The object is in the shadow.
|
| Diffuse color |
Diffuse is the color of the object in
direct daylight or artificial light that makes the object easy to see.
|
| Specular color |
Specular is the color of shiny highlights.
The highlights are reflections of the lights that illuminate the surface.
For a naturalistic effect, set the specular color to the same color as the key
light source, or make it a high-value, low-saturation version of the diffuse color.
For a matte effect, making the material appear less shiny, set the specular color to match the diffuse color.
Some shaders generate the specular color, rather than letting you choose it.
|
Some guidelines for choosing color realism.
| Direct sunlight |
Interior lightning |
Spotlight |
| Ambient color |
Deep dark purple with a hint of the diffuse color (=object's color). |
Same hue as the diffuse color (=object's color), but with a darker value. |
Very dark value of the spotlight color's compementary hue mixed with a bit of the diffuse color (=object's color). |
| Diffuse color |
to be determined. |
to be determined. |
to be determined. |
| Specular color |
Match the sunlight color. |
Close to white. |
Match the spotlight color. |
| Glosiness |
to be determined. |
to be determined. |
to be determined. |
| Ambient color |
Deep dark purple with a hint of the diffuse color (=object's color). |
Same hue as the diffuse color (=object's color), but with a darker value. |
Very dark value of the spotlight color's compementary hue mixed with a bit of the diffuse color (=object's color). |
| Diffuse color |
Use the object's color |
Use the object's color |
Use the object's color |
| Specular color |
Same hue as the diffuse, but with a higher value and a lower saturation.
If material is shiny, set color closer to the lighting color. |
Same hue as the diffuse, but with a higher value and a lower saturation.
If material is shiny, set color closer to the lighting color. |
Same hue as the diffuse, but with a higher value and a lower saturation.
If material is shiny, set color closer to the lighting color. |
| Glosiness |
Set the Glossiness to a low value.
If material is shiny, set Glossiness to higher value. |
Set the Glossiness to a low value.
If material is shiny, set Glossiness to higher value. |
Set the Glossiness to a low value.
If material is shiny, set Glossiness to higher value. |
| Ambient color |
Deep dark purple with a hint of the diffuse color (=object's color). |
Same hue as the diffuse color (=object's color), but with a darker value. |
Very dark value of the spotlight color's compementary hue mixed with a bit of the diffuse color (=object's color). |
| Diffuse color |
Use the object's color. |
Use the object's color. |
Use the object's color. |
| Specular color |
Make the specular color close to white, or to the color of the light source. White is especially characteristic of plastic materials. |
Make the specular color close to white, or to the color of the light source. White is especially characteristic of plastic materials. |
Make the specular color close to white, or to the color of the light source. White is especially characteristic of plastic materials. |
| Glosiness |
Set the glossiness to a high value. |
Set the glossiness to a high value. |
Set the glossiness to a high value. |
- The ambient color can only be seen, if you change the following:
- Select menu Rendering > Environments
- Select Environment tab.
- In the Common Paramters rollover, select Ambient color swatch.
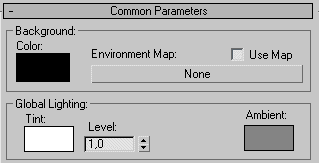
- Change the color to light gray and press Close button.
- Press Quick Render (F9 key) to see the effect.
- Assign maps to the components you want to map, and adjust their parameters.
The images you assign to materials are called maps.
- Apply the material to the object.
- If necessary, adjust the UV mapping coordinates in order to orient maps with objects correctly.
- Save the material
|
|