IOTA


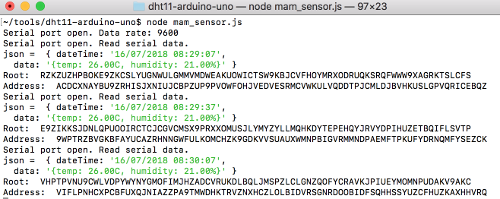
IOTA is an open-source distributed ledger. It uses a directed acyclic graph (DAG) instead of a blockchain.
IOTA's DAG is referred to as the tangle, and is a generalization of the block chain protocol.

More information about IOTA can be found at:
http://iota.org/


Send DHT11 sensor data using Arduino to IOTA Tangle using Masked Authenticated Messaging (MAM)


Information
The source codes used in this tutorial can be found at:
https://github.com/robertlie/dht11-arduino-uno

Operating system used
macOS 10.13 High Sierra

Hardware used
  • Arduino Uno rev3.0

    Arduino uno rev 3.0 front

  • Jumper wires (3x female-male, 20 cm long)

    Jumper wires female-male

  • USB 2.0 cable type A/B


    USB 2.0 cable type A/B

  • DHT11 sensor module (DHT = Digital Humidity Temperature)

    Specification:
    Supply voltage: 3.3 ~ 5.5V DC
    Output: single-bus digital signal
    Measuring range: humidity 20-90% RH, temperature 0 ~ 50°C
    Accuracy: humidity ±5% RH, temperature ±2°C
    Resolution: Humidity 1% RH, temperature 1°C
    Long-term stability: < ±1% RH / Year

    DHT11 sensor

Software prerequisites
none

Procedure
  1. Before you start, please note this tutorial was specifically written for macOS users!

    Install Node.js on your computer.
    How to do this see:
    https://nodejs.org/

    Note:
    Install Node.js on macOS
    In this tutorial I was using Node version: v10.6.0

  2. Download and install the Arduino IDE on your computer:
    https://www.arduino.cc/en/Main/Software

  3. Connect the DHT11 sensor module to the Arduino Uno using the three jumper wires.

    DHT11 sensor GND - Arduino Uno, GND (Black)
    DHT11 sensor DATA - Arduino Uno, Pin 4 (White)
    DHT11 sensor VCC - Arduino Uno, 5V PWR (Red)

    DHT11 sensor connected to Arduino Uno

    DHT11 sensor and Arduino Uno wiring

  4. Download the dht11-arduino-uno project on your computer:
    • Type: git clone https://github.com/robertlie/dht11-arduino-uno.git
    • In this project you will find the DHTlib.zip file.

      Note:
      In case you want to know, this file is created as follow:
      • Type: git clone https://github.com/RobTillaart/Arduino.git
        Note: Latest commit f683f58
      • Compress the DHTLib folder, see: Arduino/libraries/DHTLib
      • You will get: DHTLib.zip

  5. Add the DHTLib library to your Arduino IDE.
    • Start Arduino IDE.
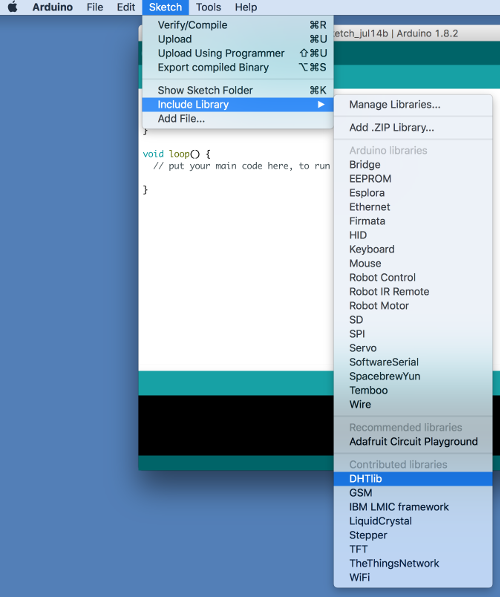
    • Select menu: Sketch>Include Library>Add .ZIP Library and select the DHTLib.zip file.
    • The library is now added.

      DHTLib added to Arduino IDE

    • There is another way to add Rob Tillaart library (You do not need to use my DHTLib.zip file):
      • Select menu: Sketch > Include Library > Manage libraries
      • In the Library Manager search for: DHTlib
      • Select this package and install its latest version.

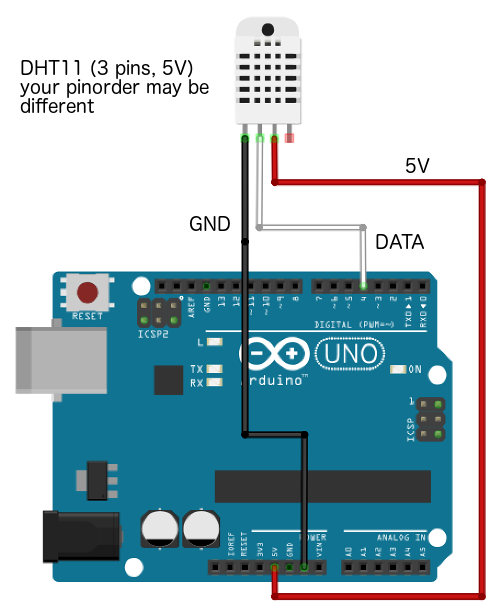
  6. Upload the dht11.ino sketch, which you can find in the dht11-arduino-uno project, to the Arduino Uno and run this sketch.
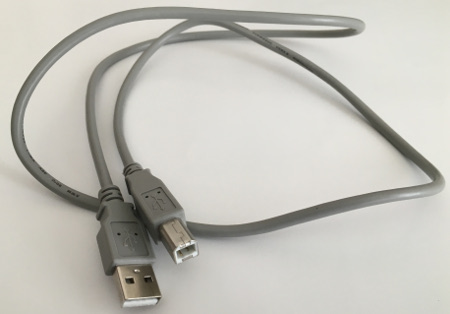
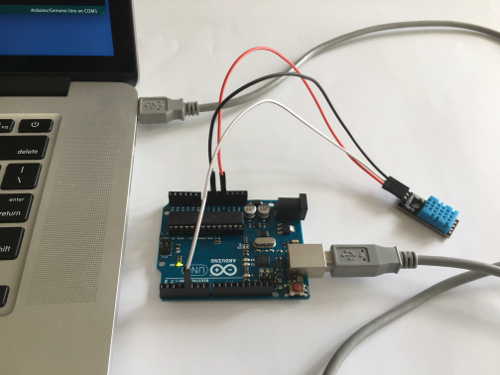
    • Connect the Arduino Uno to your computer using the USB cable.

      DHT11 connected to Arduino Uno

    • Start Arduino IDE.
    • Select the board, select menu: Tools > Board > Arduino/Genuino Uno
    • Select the port, select menu: Tools > Port > /dev/cu.usbmodem1421 (Arduino/Genuino Uno)
      Note: Your port name may differ.
    • Upload the dht11.ino sketch, select menu: File > Select the dht11.ino file.
    • Press the verify button to verify the sketch. Make sure there are no errors.
    • Press the upload button to upload the sketch to the Arduino Uno.
    • Open the Serial monitor, select menu: Tools > Serial Monitor.
      Make sure the baud rate is set to 9600 baud (bottom right)

      DHT11 data displayed in serial monitor

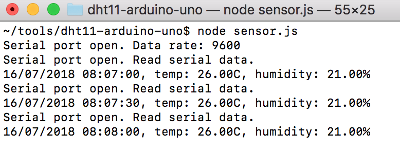
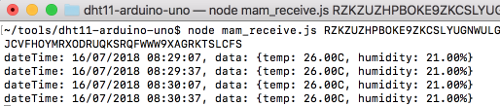
      The humidity and temperature data are displayed at 30 seconds intervals.
      CLOSE THE SERIAL MONITOR WHEN YOU CONTINUE WITH THE NEXT STEPS.

  7. Execute the dht.js Node application to display the humidity and temperature data on your computer.
    • First find the serial port your computer is communicating with your Arduino Uno:
      • Open a terminal
      • Goto the dht11-arduino-uno project and type:
        node listports.js

        For example you see the following:
        /dev/tty.Bluetooth-Incoming-Port
        /dev/tty.usbmodem1421 (This is the one I am using, yours may differ)

        Note:
        On a macOS, instead of using the above mentioned application, type:
        ls /dev/tty.*

      • Make sure the serial port is not used.
        IF THE SERIAL MONITOR IS RUNNING, STOP IT.
        To verify if the serial port is not used, type (for macOS):
        lsof | grep "/dev/tty.usbmodem1421"

        If the serial port is NOT used, nothing should be returned.

    • Enter the project, type: cd dht11-arduino-uno
    • Type: npm install

      Note:
      The sensor.js application uses the "serialport" npm package.
      More information about this package see: https://github.com/node-serialport/node-serialport
    • Execute the sensor.js application and check if the humidity and temperature data are displayed:
      • Type: node sensor.js

        sensor.js output

        The humidity and temperature data are displayed at 30 seconds intervals, which is set in the dht11.ino sketch.

      • To stop sensor.js, press CTRL+Z and also delete the running process(es):
        Type: ps -ef | grep sensor.js
        Type: kill -g THE_PROCESS_NUMBER

  8. Execute mam_sensor.js.
    This script will store the temperature and humidity data from the DHT11 sensor module to the Tangle.
    • Type: node mam_sensor.js
      Each stored sensor data has a separate root. Copy a root which will be used in the next step.

      mam_sensor.js output

    • Open another terminal and type: node mam_receive.js your_root
      The stored sensor data is displayed.

      mam_receive.js output

    • To stop mam_sensor.js, press CTRL+Z and also delete the running processes:
      Type: ps -ef | grep mam_sensor.js
      Type: kill -g THE_PROCESS_NUMBER

    Note:
    The full node endpoint and sidekey are both hardcoded in the javascript files.

  9. For more information, watch this video: