3D Studio Max (3dsmax) is a 3D modeling, animation, and rendering tool.
It is owned by Autodesk, an United States (San Rafael, California) based company.
More information about 3D Studio Max can be found at: http://www.autodesk.com/3dsmax/
Note: A free 30 days trial version can be downloaded from the Autodesk site.
Some 3D Studio Max forums:
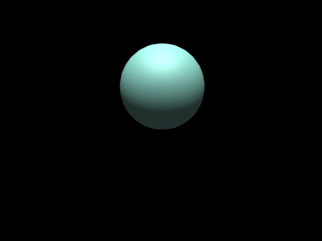
Lighting and shadows.
Information
The information below is based on 3D Studio Max 7.
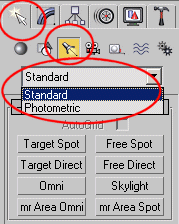
There are two types of lights:
- Standard
Used for quick renderings, where accuracy and realism are not required.
By using standard lights the scale of the object has no influence.
- Photometric
Photometric lights behave more like real-world lights.
Use photometric lights for lighting an interior space or an object.
In both cases make sure the model have realistic (=real-world) dimensions.
When the model is too large the photometric light is not great
enough to illuminate. In this case during rendering the model remains black.
If no lighting is specified in a scene (standard or photometric), 3dsmax applies a default
lighting from a single light source. When you add a light, the default lighting is turned off.
During rendering, only direct light is shown (image looks shadowy).
Direct light is light cast by the lights in the scene, with no bouncing off of surfaces.
To avoid the shadowy effect objects must reflect light (= a.k.a. advanced lighting, global illumination,
diffuse light or indirect light) by using radiosity.
When you apply the radiosity solution, additional mesh (a.k.a radiosity mesh) is added to
the scene. Light levels are stored in this mesh.
An isotropic distribution means that all light comes from a central point and
radiates uniformly outward in all directions.
Procedure
Apply photometric lights for lighting an interior space
- Choose Create > Lights > Photometric Lights > Presets > 75W Bulb.
This creates a light object with a typical wattage.
- Open the General Parameters rollout. Make sure On and Shadows are enabled.
Note: By disabling On, the light is switch off.
- Open the Itensity/Color/Distribution rollout. By enabling the Mulitplier and changing its value,
the light intensity can be changed.
- Position the light in your scene. You can add more light sources if you wanted.
- You can also apply radiosity to implement indirect light in your scene.
- Click Render
 . .
Apply photometric lights for lighting an object
- On the Create panel
 ,
turn on Lights ,
turn on Lights  ,
then choose Photometric from the drop-down list. ,
then choose Photometric from the drop-down list.
- On the Object Type rollout, click Target Point to turn it on.
- In a viewport, place the light and drag the target (Pointxx.Target) until it is aimed at the object.
You can select the target (Pointxx.Target) by pressing H.
This light source is known as the key light and it is recommended not to light the object
directly from the front. It is better to light it from an angle and also angled down.
- Open the General Parameters rollout. Make sure On and Shadows are enabled.
Note: By disabling On, the light is switch off.
- Open the Itensity/Color/Distribution rollout. By enabling the Mulitplier and changing its value,
the light intensity can be changed.
- Besides the key light it is recommended to place a so called fill light which is usually less brighter
than the key light.
On the Object Type rollout, click Free Point to turn it on.
- Place the fill light on the other side of object. The fill and key light can form about a 90-degree angle with the object.
- Open the General Parameters rollout. Make sure On and Shadows are enabled.
Note: By disabling On, the light is switch off.
- Open the Itensity/Color/Distribution rollout. By enabling the Mulitplier and changing its value,
the light intensity can be changed. The fill lights have a lower intensity.
- Click Render .
If the object is still too dark, add more fill lights.
Apply radiosity (=indirect light)
- On the Render Scene dialog
 ,
click the Advanced Lighting tab. ,
click the Advanced Lighting tab.
- On the Select Advanced Lighting rollout, choose Radiosity from the drop-down list.
- Open the Radiosity Meshing Parameters rollout, and turn on Enabled under Global Subdivision Settings.
- Open the Rendering Parameters rollout, and choose Re-Use Direct Illumination From Radiosity Solution.
This option will speed up rendering.
- On the Radiosity Processing Parameters rollout, set Initial Quality to 60 per cent.
- Also on the Radiosity Processing Parameters rollout, click Start.
- Stop button is available while the generation of a radiosity solution is in progress.
After the radiosity solution has been generated, the Reset All and Reset buttons become available.
- Click the Renderer tab to go to the Renderer panel.
- On the Renderer panel's Default Scanline Renderer rollout, click to turn on Antialiasing
in the Antialiasing group. This will remove some jaggedness in the rendered scene
and thus improve the rendering's appearance.
- Click Render.
Disable light
Method 1:
- Select the light and then go to the Modify panel. On the General Parameters rollout,
in the Light Type group, click the On toggle to turn it off.
Method 2:
- Right-click the light and choose Properties from the Transform (lower-right)
quadrant of the quad menu.
- The Object Properties dialog is displayed.
- On the General panel, in the Rendering Control group, turn off the Renderable toggle.
- Render the scene .
The light should not cast any light.
Method 3:
- Choose Tools > Light Lister.
- The Light Lister dialog is displayed.
- For individual lights, you can now control the lights.
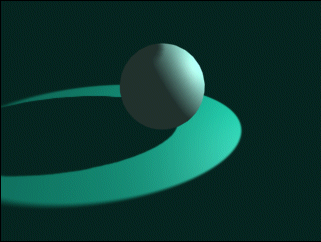
Apply shadow
Method 1: Create a light/dark and sharp/soft edged shadow:
- Use the Select Objects dialog (H button) to select the light and then go to the Modify panel
 . .
- Open the General Parameters rollout. Make sure Shadows are On.
In the Shadows group, choose Shadow Map from the drop-down list.
Note: By disabling Shadows, no shadows are rendered.
- Open the Shadow Map Parameters rollout.
Change the value of Sample Range (1.0 to 50.0).
If the value is greater, the edge of the shadow is softer.
- Open the Shadow Parameters rollout.
Change the value of Density (0.0 to 1.0).
If the value is greater, the darker the shadow.
- Click Render .
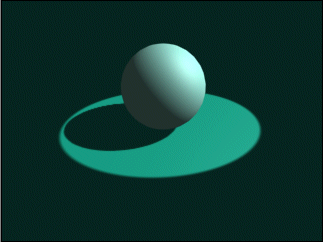
Method 2: Create a light/dark and more/less diffuse shadow:
- Use the Select Objects dialog (H button) to select the light and then go to the Modify panel
.
- Open the General Parameters rollout. Make sure Shadows are On.
In the Shadows group, choose Area Shadows from the drop-down list.
Note: By disabling Shadows, no shadows are rendered.
- Open the Area Shadows rollout.
In the Basic Options group, make sure that Rectangle Light is chosen.
In the Area Light Dimensions group, change the Length and Width to both equal values.
If the value is greater, the shadow is getting more diffuse.
- Open the Shadow Parameters rollout.
Change the value of Density (0.0 to 1.0).
If the value is greater, the darker the shadow.
- Click Render .
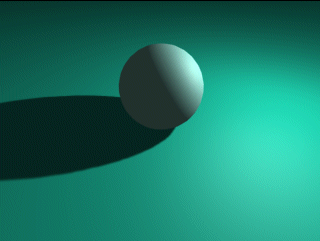
Method 3: Create a light/dark sharp edged shadow:
- Use the Select Objects dialog (H button) to select the light and then go to the Modify panel
.
- Open the General Parameters rollout. Make sure Shadows are On.
In the Shadows group, choose Ray Traced Shadows from the drop-down list.
Note: By disabling Shadows, no shadows are rendered.
- Open the Shadow Parameters rollout.
Change the value of Density (0.0 to 1.0).
If the value is greater, the darker the shadow.
- Click Render .
Lights
- Target Spot.
Target spotlights emits cone shaped light, but they also have a positionable targeting
object that can be used to control where the light is pointed.
 . .
- Target Direct.
Target directional lights emit light in a given direction without the cone-like spread of
a spotlight. They can be either circular or rectangle shaped.
A positionable targeting object can be used to control where the light is pointed.
 . .
- Omni.
Omni lights emit light in all directions from a single point.
 . .
- Free Spot.
Free spotlights consist of a point of origin that emmits light in a cone or piramid shaped pattern.
 . .
- Free Direct.
Free directional lights emit light in a given direction without the cone-like spread of
a spotlight. They can be either circular or square shaped.
 . .
|
|